Building Snake
Structure
The code is written in three files:
src/main/scala/Snake.scala: logic of the game, you will work only this filesrc/main/scala/Launcher.scala: logic to start the game. This file is providedsrc/main/scala/Painter.scala: logic to draw the terrain and snake on the screen. This file is providedindex.html: the web page that contains the game. Open this file in Firefox/Chrome/Safari to play
How to compile and run
- Start a
sbtshell. - To run the game, execute the task
fastLinkJS. This will compile the Scala code into a Javascript file which you can find intarget/scala-3.0.2/snake-fastopt/main.js. - Open
index.htmlin your browser of choice, this file loads the Javascript produced in the previous step and runs it.
Logic overview
The state of the game at any given time is represented by the World case class
case class World(snake: Snake, fruit: Fruit, size: Size)
In other words, each object of type World is a photograph of the state of the
game. It contains a snake, a fruit, and the dimensions of the world (width and
height).
A snake is made up of blocks. Each block has x and y coordinates. All of
the blocks of a snake are collected into a list. The snake also contains the
direction in which it is moving.
The goal of this workshop is to implement the updateGame function which,
provided the previous state of the game and the action of the player, returns
the next state of the world.
The code in Launcher.scala creates a fresh world and every 250 milliseconds
calls nextWorld.
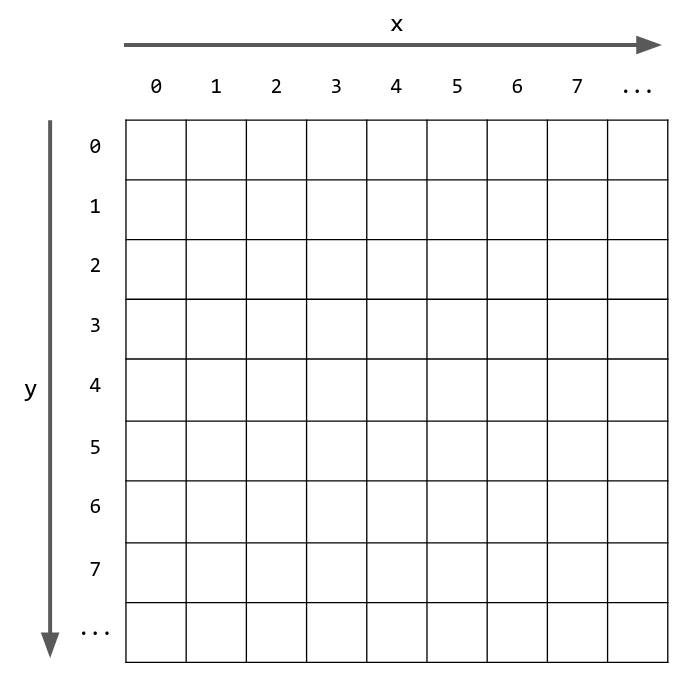
The grid
The game can be represented as a table, or grid. Each element of the grid can be
empty, occupied by a fruit or by a block of the snake. The dimensions of the
grid are specified in the size attribute of the case class
(world.size.width, world.size.height):
heightis the number of rows of the grid. We will use of the convention of namingythe variables indicating vertical positionwidthis the number of columns of the grid. We will use of the convention of namingxthe variables indicating horizontal position- The top left corner of the grid has position
(x=0, y=0) - The top right corner of the grid has position
(x=width-1, y=0) - The bottom left corner of the grid has position
(x=0, y=height-1) - The bottom right corner of the grid has position
(x=width-1, y=height-1)
A World example

Part 1: Growing the snake
Here you will implement the eating logic of the snake. If the snake's head
comes in contact with the fruit, then its tail grows one block in length. To check if the
head (a Block) is in contact with the fruit, we can compare it with the position
of the fruit (its underlying Block). Remark that we are comparing two objects with the
same type (Block).
Start by implementing the eatsFruit function.
To test eatsFruit, run the following command in the sbt shell:
testOnly TestEatsFruit
You can then move to the nextTail function which creates the new tail of the snake.
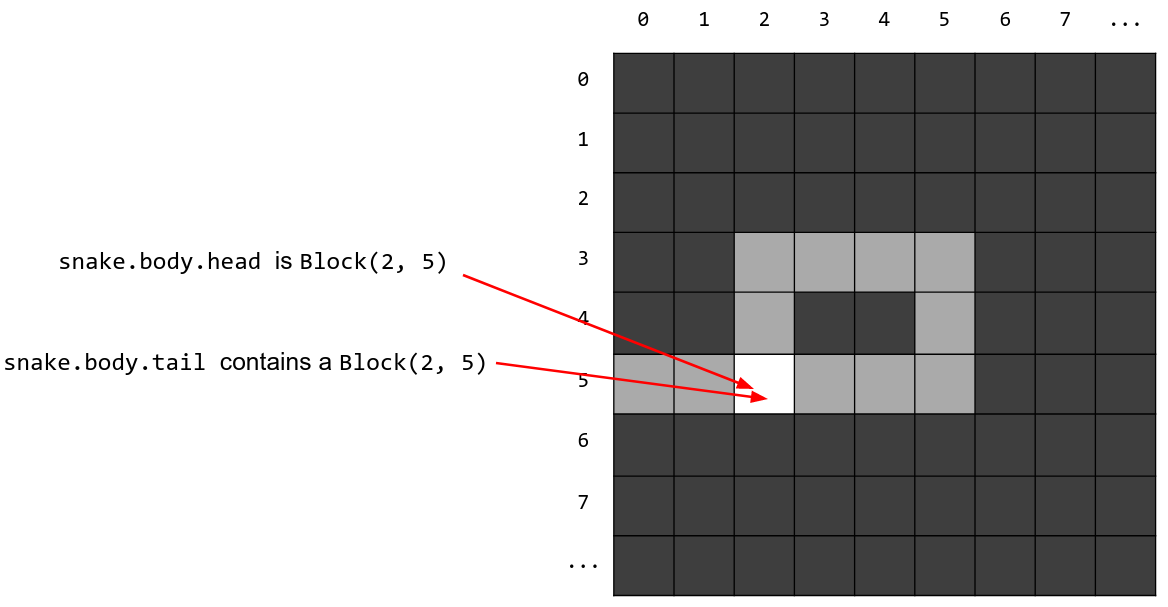
To do this, we need to understand how the snake moves:

At each step, the head of the snake is computed (you will do this in Part 3).
The new head is added at the beginning of the body list of the snake. Then the
last block of the snake is removed to obtain the illusion of movement: the
number of blocks is constant but the position has changed. When the snake has
eaten a fruit, we still need to compute a new head, but the number of blocks
grows by 1. In this case, we do not need to remove the last block of the snake.
Implement the function nextTail which handles both situations: when the snake
has eaten and it needs to grow, isEating is set to true otherwise, when it
is false you need to implement the movement logic described above. Make sure
you have a look at the Scala basics page to know how to manipulate lists.
To test nextTail, run the following command in the sbt shell:
testOnly TestNextTail
Part 2: Reacting to player's input
You will now implement two functions, opposite and nextDirection so that you
can modify the direction of movement of the snake when the player changes it
with the arrow keys.
Start with opposite, which you will need for nextDirection. This function
returns the direction which is opposite to the one it receives. So for example
if it receives Direction.Left it will produce Direction.Right. Use pattern
matching (as described in Scala basics)
To test opposite, run the following command in the sbt shell:
testOnly TestOpposite
After that you can move to nextDirection. Here you will use pattern matching again,
this time on Option, to compute the next direction of the snake.
If the user changed the direction, then inputDirection will be Some(...) and you need
to adopt the direction in it. Otherwise you maintain (return) the current direction.
You need to be careful: at any time the snake can adopt three new directions, the head cannot go inside the body. If the user requests this impossible direction, you must keep the current direction.
To test nextDirection, run the following command in the sbt shell:
testOnly TestNextDirection
Part 3: Moving the head
In this part you will update the next position of the head of the snake.
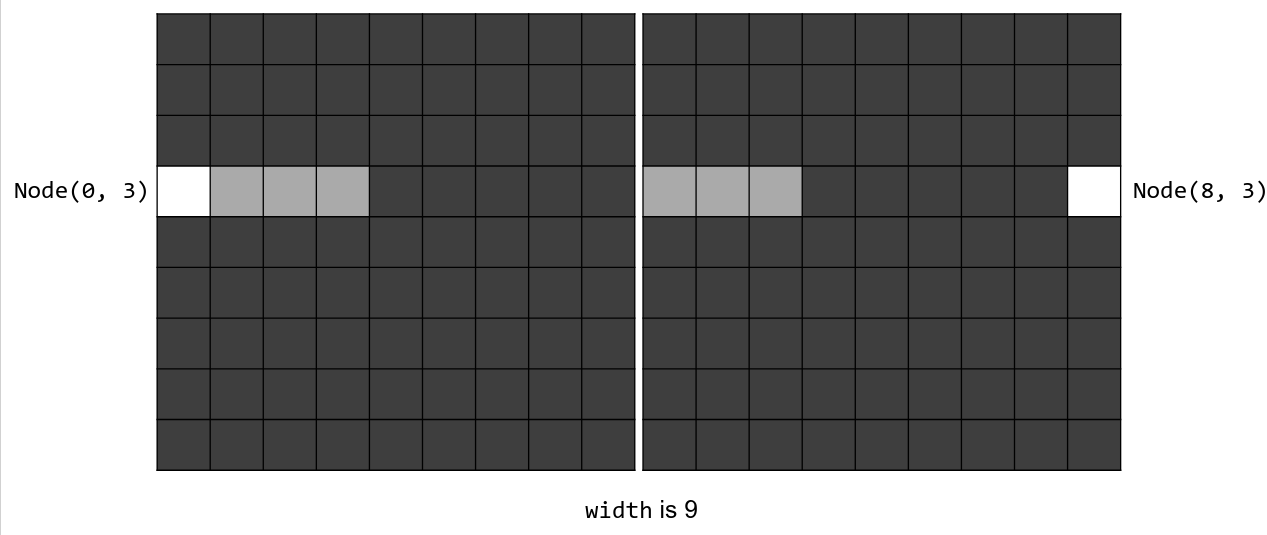
First, implement the wrapY function, similarly to the wrapX above it.
This functions is needed so that when the snake goes against the top border of
the grid, it appears on the bottom of the grid going up. You can see an example
of the wrapX function:
To test wrapY, run the following command in the sbt shell:
testOnly TestWrap
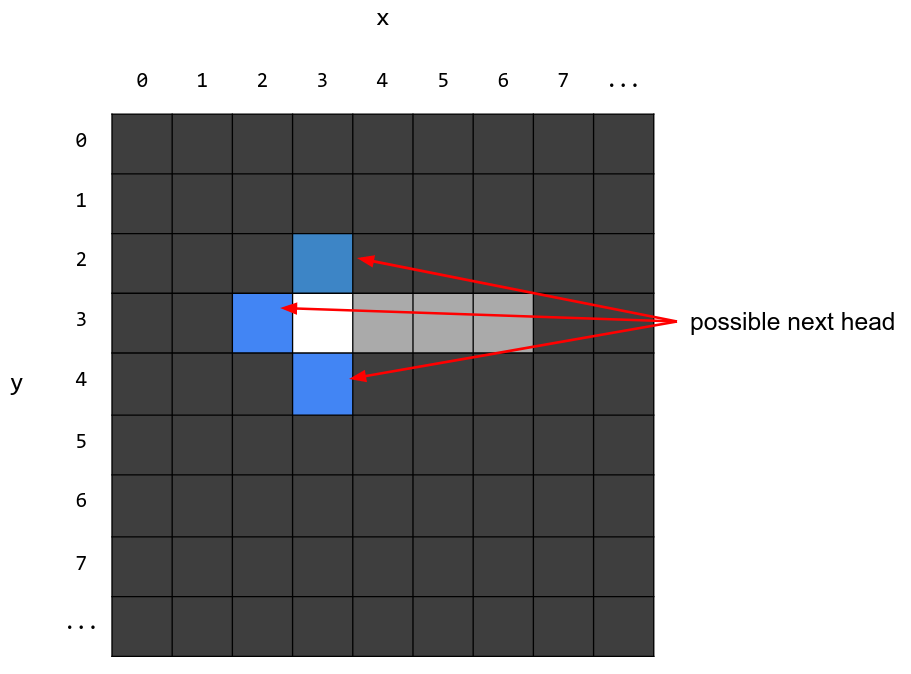
You can now work on the nextHead function. Its goal is to create the new head
of the snake it receives as argument. The position of the new head will depend
on the argument nextDirection. You will create a new Block with the x and
y attributes derived from those of the head of the snake. Remember the
example grid at the beginning of this page: going right means increasing the x
component while the y component stays unchanged; going down means increasing
the y component while the x component stays unchanged.
You will need the wrapY and wrapX functions in nextHead.
To test nextHead, run the following command in the sbt shell:
testOnly TestNextHead
Part 4: Updating the Snake
You now have all the functions required to update the direction, head and tail
of the snake. Use them in nextSnake to create the snake updated for the next
period. In Scala basics you will find how to combine head and tail to
create a new body
To test nextSnake, run the following command in the sbt shell:
testOnly TestNextSnake
Part 5: Updating the world
The only moving parts of World are snake and fruit. In parts 1 to 4 you
developed the tools to detect if the snake is eating and to update its attributes. Use them
in nextWorld to update the snake.
You also need to update the fruit: if the snake ate it, create a new one using
the provided function createRandomFruit, otherwise you can reuse the existing
fruit.
With the new snake and new fruit, you can return a new World (its size remains unchanged).
To test nextWorld, run the following command in the sbt shell:
testOnly TestNextWorld
Part 6: Updating the game
In this last part you will handle a few possible events in the game.
Start by implementing bitItself which is used to check if the snake has bit
itself.
To test bitItself, run the following command in the sbt shell:
testOnly TestBitItself
This function is used in updateGame to check if the game is over
Finally you can implement the last three cases of the pattern match in
updateGame: if the user presses p the game is paused and the world does not
change. Otherwise you can use the functions previously developed to update the
World
To test updateGame, run the following command in the sbt shell:
testOnly TestUpdateGame